 Skip to content Skip to content
Welcome, fellow developers Today, we’re diving into 5 Tips and Tricks for Mastering Next.js 14 for a Seamless Development Experience These tricks are essential to enhancing your development experience. Whether you’re new to Next.js or a seasoned pro, these insights will help you navigate some of the more confusing aspects of this powerful framework.
Now, let’s get started
1. Simplifying Image Handling in Next.js
One of the common areas of confusion in Next.js is handling images, both local and remote. Let’s break this down:
Local Images

When it comes to local images in Next.js, the framework provides a number of advantages:
- Automatic image optimization:Next.js automatically generates different resolutions of an image, so the appropriate image is loaded based on the user’s screen size and resolution. This helps to improve performance and reduce bandwidth usage.
- Image CDN and HTTP cache headers: When using Next.js, images are served via a content delivery network (CDN) with proper HTTP cache headers. This ensures that images are delivered quickly and efficiently, improving the user experience.
- Image responsiveness: this feature of Next.js ensures that images load appropriately on different devices and screen sizes. When you use the Image component in Next.js, the framework automatically loads the most appropriate resolution for the user’s screen, based on the available options. For example, if you’re loading an image on a mobile device, the image might be loaded at a smaller resolution to optimize performance and reduce data usage. However, if you’re loading the same image on a desktop computer with a larger screen, the image might be loaded at a higher resolution to provide a better visual experience.
Example Code:
import Image from 'next/image';
import hoy from '../public/hoy.jpg';

export default function LocalImage() {
  return <Image src={hoy} alt="Hoy Image" />;
}
explanation:
This way, those lines use the Next.js Image component to display a local image.
First, the image component is imported from the next/image module, which provides several built-in optimizations for loading and displaying images.
Then, the hoy.jpg file is imported from the local public directory using ES Module imports. This allows the image component to access the file directly, without needing to use a URL.
Finally, the Image component is rendered with the src prop set to the hoy.jpg file, which displays the image on the page. Read more on this at Next.js
Remote Images
Video Description: A Next.js component displaying a remote image from Unsplash. The image loads with a blur effect that transitions to full clarity, demonstrating blur data for a better user experience.
For remote images, you’ll need to provide blur data to ensure a smooth loading experience. Here’s how you can do it using the sharp and placeholder packages:
- Install the packages:
npm install sharp placeholder-image- Create a function to fetch and convert the image to base64:
   import { getPlaceholder } from 'placeholder-image';

   async function getBase64(url) {
     const res = await fetch(url);
     const buffer = await res.arrayBuffer();
     return getPlaceholder(buffer);
}- Use the base64 data in your component:
   import Image from 'next/image';

   export default function RemoteImage() {
     const blurData = await getBase64('https://source.unsplash.com/random');
     return (
       <Image
         src="https://source.unsplash.com/random"
         alt="Random Image"
         placeholder="blur"
         blurDataURL={blurData}
       />
     );
   }
explanation:
Those functions will fetch a random image from Unsplash, generate a blurred version of it, and display it in the Next.js Image component.
First, the getBase64 function is defined, which uses the fetch method to retrieve the image as an array buffer. It then uses the getPlaceholder function to generate a blurred version of the image from the array buffer and returns it as a Base64 encoded string.
Environment variables are crucial for keeping your sensitive data secure. In Next.js, variables prefixed with NEXT_PUBLIC are exposed to the browser, so it’s important to handle them carefully.
Would you like to try out a new project? well check this out Full Stack Uber Clone App: Guide to building an uber like app
2. Managing Environment Variables Safely
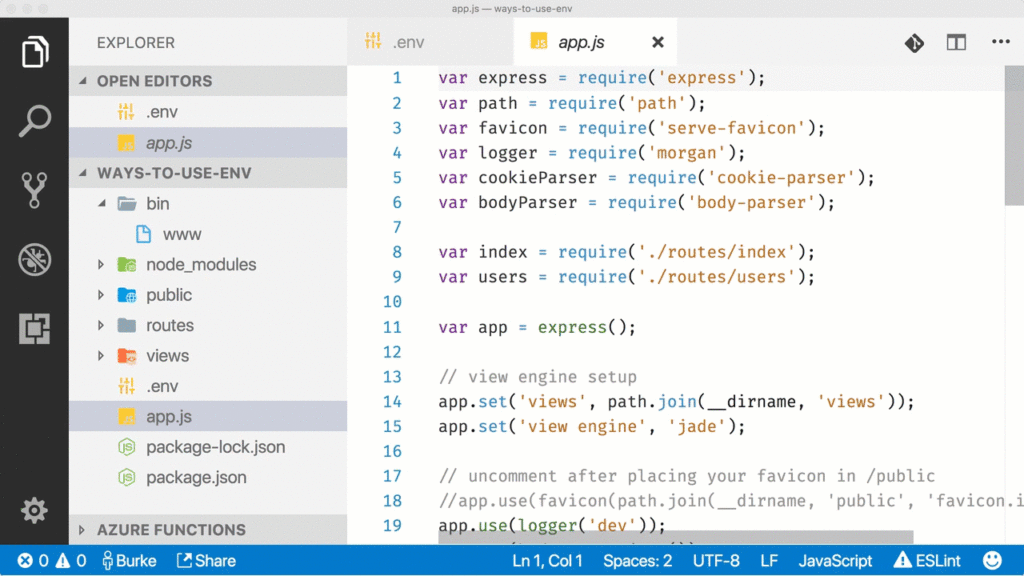
Best Practices
- API Keys and Secrets: It’s important to keep sensitive data like API keys and secrets secure to prevent unauthorized access. One common mistake is to expose these keys by prefixing them with NEXT_PUBLIC, which makes them accessible on both the server and client sides of the application. Instead, you should use the process.env.API_KEY format to access them only on the server side.
- Configuration: It’s recommended to store environment variables in a .env file, which should be added to your .gitignore file to prevent it from being accidentally committed to a public repository. the .env file is a simple text file that stores key-value pairs of environment variables, which can be used to configure your application without hard-coding values in the source code. For example, you could store your API key as a value in the API_KEY variable in the .env file.
3. Understanding Caching from our 5 Tips and Tricks for Mastering Next.js 14
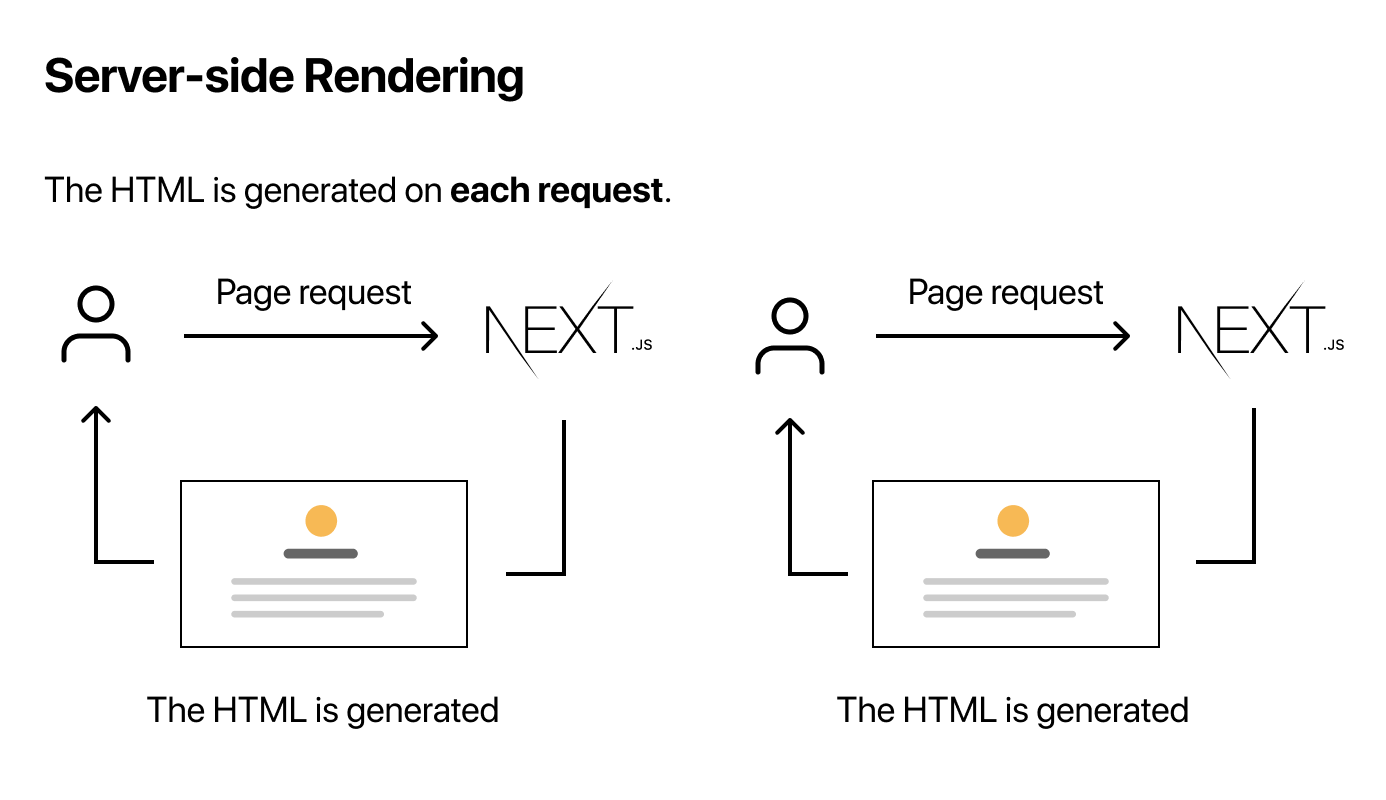
Caching can be tricky, especially when transitioning from development to production environments. Here’s what you need to know:
Development vs. Production
When you’re developing a Next.js application, the data fetched from APIs or databases is dynamic and changes with each refresh of the page. This is because the development mode is designed to make it easy for developers to test and debug the application without having to worry about caching or static rendering.
Example Code:
export async function getStaticProps() {
  return {
    props: { random: Math.random() },
    revalidate: 5, // Revalidate every 5 seconds
  };
}
Image Description:
This code defines a getStaticProps function that is called at build time to fetch data that will be passed to the page as props.
The getStaticProps function returns an object with two properties: props and revalidate. The props property is an object containing a random key with a value generated by the Math.random() function. This will be passed as props to the page when it’s rendered.
The revalidate property tells Next.js to revalidate the page (re-run getStaticProps) every 5 seconds.
Revalidation and Dynamic Data
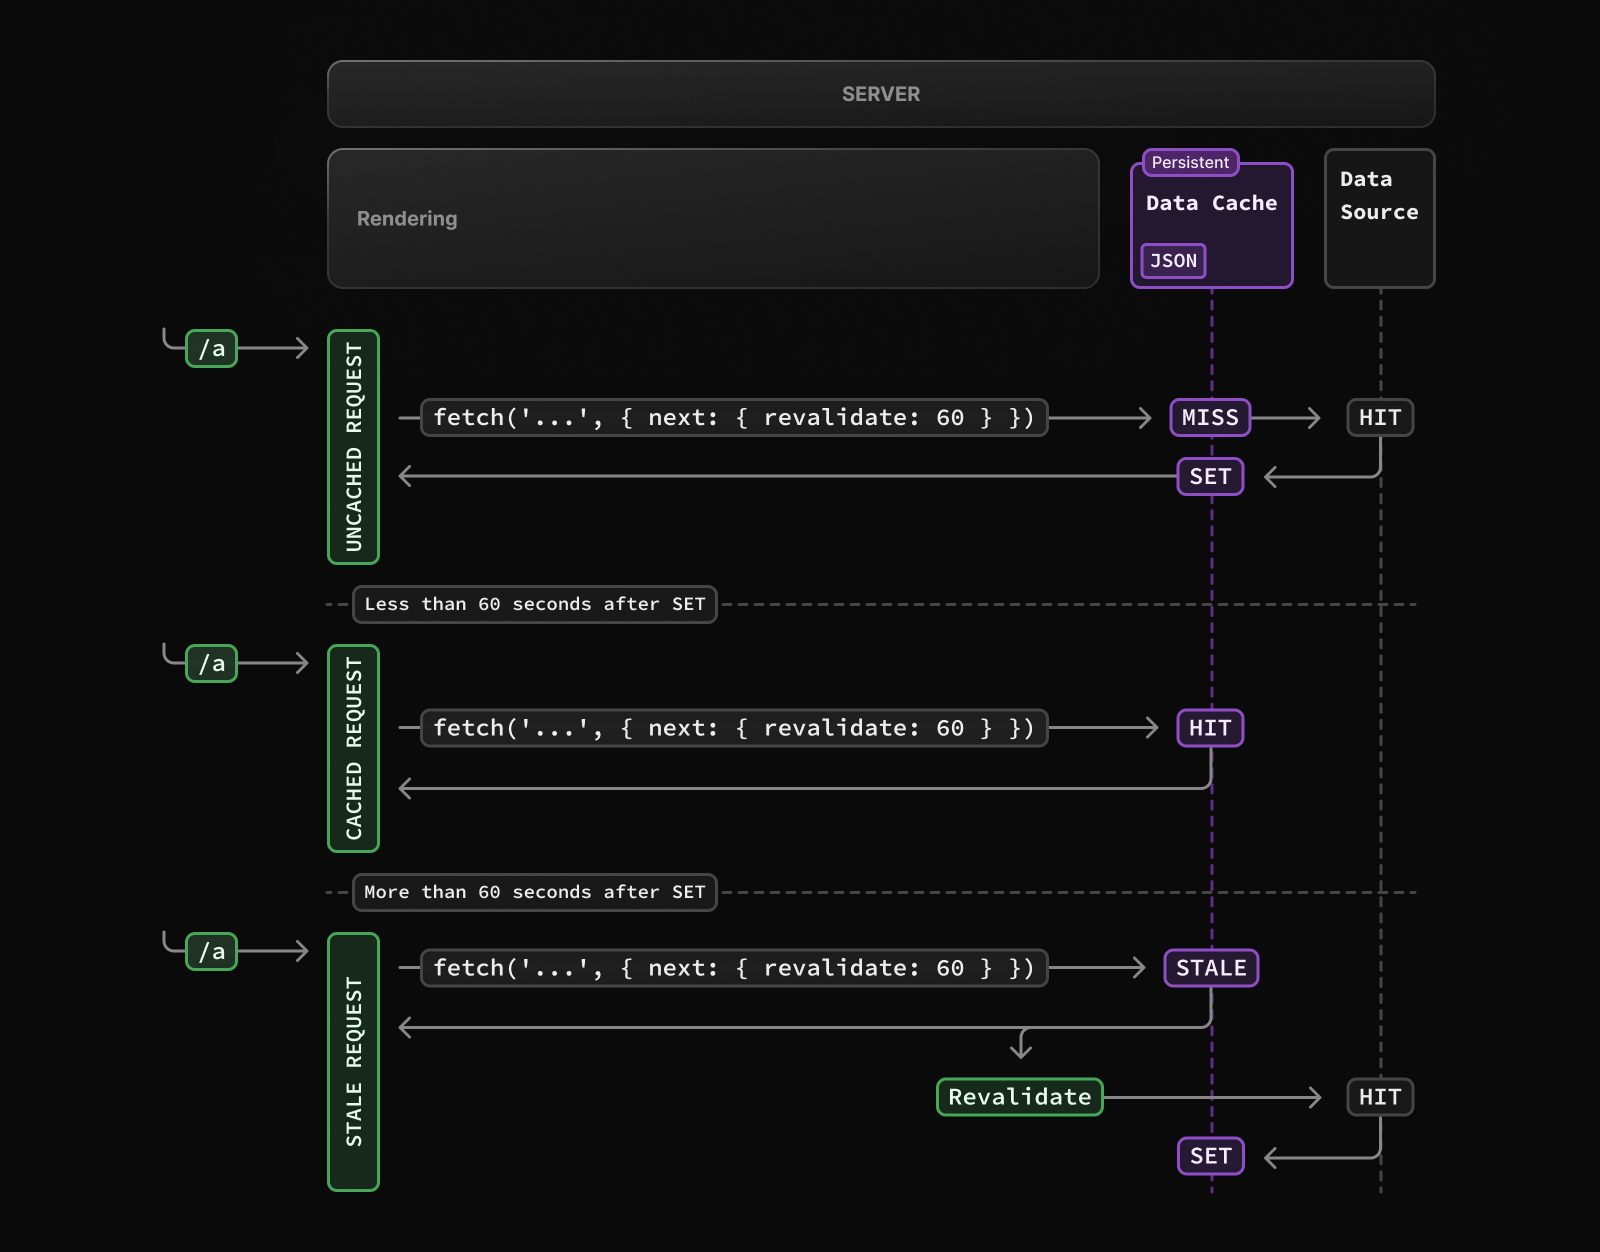
revalidation and dynamic data in Next.js!
Revalidation is the process of automatically re-fetching data from an API or database to keep the content fresh and up-to-date. Next.js allows you to specify a revalidation time in the getStaticProps and getServerSideProps functions. This means that the data will be automatically re-fetched at the specified interval, ensuring that users always see the most recent data.
To keep data fresh, use the revalidate option or force a dynamic fetch with forceDynamic.
export const revalidate = 5; // Revalidate every 5 seconds
export const dynamic = 'force-dynamic'; // Always fetch fresh data
explanation:
These two lines of code are part of the getStaticProps and getServerSideProps functions, they are used to specify revalidation and dynamic fetching rules.
The first line, export const revalidate = 5, sets the revalidation time for the page’s static data to 5 seconds. This means that whenever the page is requested, if the page is more than 5 seconds old, the server will fetch new data from the API or database to display the latest information to the user.
4. Optimizing Data Fetching in Server Components
To streamline your Next.js applications, avoid using API routes for server-side data fetching. Instead, fetch data directly within your server components.
Fetching data Directly

Fetching data directly is a powerful feature that allows developers to retrieve data from an API or database and use it directly in the component without the need for a separate data fetching function like getServerSideProps or getStaticProps.
To fetch data directly, you can use the useEffect and useState hooks provided by Next.js. The useEffect hook allows you to perform side effects, such as data fetching, after a component has been rendered. The useState hook allows you to manage the component’s state, which can be used to store the fetched data.
Example Code:
export async function getServerSideProps() {
  const res = await fetch('https://api.example.com/data');
  const data = await res.json();
  return { props: { data } };
}
explanation:
This code defines an async function, getServerSideProps, which fetches data from a remote API using the fetch method, then parses the response using the json method and returns an object with a props property that contains the data fetched from the API.
This function fetches data from a remote API and populates the page with the data. The getServerSideProps function is called before the page is rendered, so the fetched data is available in the page’s component as props.
Reusable Server Actions
For reusable logic, create server actions and import them as needed:
the getJoke function from a server/actions file in a Next.js page.
First, the getJoke function is imported from the server/actions file. This function presumably makes a request to an API or database to fetch a joke.
Next, the Page component is defined, which uses the async keyword, indicating that it will perform asynchronous operations. Inside the component, the joke variable is assigned the result of the await getJoke() call. This ensures that the page doesn’t render until the joke has been fetched.
The use of getServerSideProps enables the fetching of data on the server-side, allowing for a smoother user experience with the page already preloaded with data. This can lead to faster page loads and better search engine optimization (SEO).
React component that uses the useState hook to create a local state variable, counter, that is initially set to zero. The component renders a button that increments the counter by one every time it is clicked. The render method returns a span element that displays the current value of the counter.
5. Differentiating Between Client and Server Components
Understanding when to use client vs. server components can be challenging. Here’s a quick guide:
Default Behavior
In Next.js, By default every component is considered a server component unless it is explicitly marked as a client component by using the use client directive.
This means that by default, all components in a Next.js application are executed on the server, and their output is rendered directly in the HTML before being sent to the client (browser). This provides several benefits, such as faster initial load times and better search engine optimization (SEO).
However, there are cases where certain components should be executed on the client for performance or functionality reasons, and that’s where the use client directive comes in
Example Code:
export default function Page() {
  return (
    <div>
      <ServerComponent />
      <ClientComponent />
    </div>
  );
}
This uses a ServerComponent and ClientComponent on the same page.
First, the ServerComponent and ClientComponent components are used as direct children of the Page component. This means that both components will be rendered in the final page.
The ServerComponent component is executed on the server, and its output is rendered directly in the HTML. This component can access server-side data and can perform operations that require server-side resources, such as database queries.
On the other hand, the ClientComponent component is executed on the client (browser) after the page has been rendered.
Client Providers and Composition
You can wrap server components with client providers without breaking functionality.
One of the advantages of using Next.js is that you can wrap server components with client providers without losing any functionality.
This is known as “client composition”, and it allows you to combine the benefits of server-side rendering and client-side execution in a single application.
For example, you can wrap a server component with a client-side component, such as a React Router, to provide client-side routing capabilities without compromising the server-side rendering of the server component.
This flexibility in composition allows you to build more complex and feature-rich applications without sacrificing performance or functionality.
// theme.tsx
export const ThemeProvider = ({ children }) => {
  return <div className="theme-provider">{children}</div>;
};

// layout.js
import { ThemeProvider } from '../components/theme';

export default function Layout({ children }) {
  return <ThemeProvider>{children}</ThemeProvider>;
}
explanation:
implementation of a ThemeProvider component and its usage in a Layout component.
The ThemeProvider component acts as a higher-order component (HOC) that wraps its child components and provides them with a theme that can be used to style the components.
The ThemeProvider component itself is quite simple. It returns a <div> element with a className of “theme-provider”, which can be used to style the component and its children.
Testing and Debugging
Of course! Debugging and testing can be a bit of a puzzle sometimes, but Next.js gives us some handy tools to solve it. One cool trick to check whether a component is a client component or a server component is to try using the useState hook.
If the component is a server component, you’ll get an error message because server components can’t use useState. But if the component is a client component, the useState hook will do its job, letting you update the component’s state and re-render as needed. Pretty neat, right?
To test if a component is client or server, try using a hook like useState. If it works without errors, it’s a client component.
import { useState } from 'react';

export default function TestComponent() {
  const [text, setText] = useState('Hello');
  return <div>{text}</div>;
}
explanation:
This TestComponent component is using the React useState hook to manage its state. The useState hook is creating a new variable called text, which starts with the initial value of ‘Hello’. The state variable and its setter function (setText) are assigned to the const [text, setText] array.
The component then returns a div element with the current value of text as the content. Since the useState hook is client-only, this component must be a client component.
When the component renders, the value of the text is initially set to ‘Hello’.
i hope this 5 Tips and Tricks for Mastering Next.js 14 for a Seamless Development Experience helped you out
FAQ
1. How do I handle local images in Next.js?
Local images in Next.js don’t require specifying width and height. Simply import your image from the public directory and use the Image component.
Example:
import Image from 'next/image';
import hoy from '../public/hoy.jpg';

export default function LocalImage() {
  return <Image src={hoy} alt="Hoy Image" />;
}
2. How can I add blur data to remote images in Next.js?
You can add blur data to remote images using the sharp and placeholder packages to generate base64 encoded blur data.
Steps:
- Install
sharpandplaceholder-image. - Create a function to fetch and convert the image to base64.
- Use the base64 data in your
Imagecomponent.
3. What is the difference between environment variables prefixed with NEXT_PUBLIC and those without?
Environment variables prefixed with NEXT_PUBLIC are exposed to the browser and available in the client-side code. Variables without this prefix are only available in the Node.js environment, keeping them secure from client-side exposure.
4. How does caching work in Next.js, and how can I control it?
Caching in Next.js differs between development and production. In development, data is dynamic and changes with each refresh. In production, Next.js attempts to render pages statically. You can control revalidation and dynamic data fetching using options like revalidate and forceDynamic.
5. Should I use API routes to fetch data in server components?
No, it’s better to fetch data directly within your server components rather than using API routes. This reduces unnecessary HTTP requests and leverages Next.js’s server-side capabilities efficiently.
6. How do I differentiate between client and server components in Next.js?
By default, components are server components unless marked with use client. Client components can use hooks like useState and useEffect and can be nested within server components.
7. Can I wrap server components with client providers?
Yes, you can wrap server components with client providers. This allows you to use features like theming while keeping the benefits of server-side rendering.
8. How can I test if a component is a client or server component?
You can test by using a hook like useState. If the component works without errors, it’s a client component.
9. Where can I learn more about these tips and tricks?
For a more in-depth understanding, watch this comprehensive Next.js 14 video, which covers these tips and much more.
10. How can I stay updated with more Next.js tips and tutorials?
Subscribe to our blog and YouTube channel, follow us on social media, and join our community on Discord or our forum to stay updated with the latest trends and tutorials in web development.
Conclusion
We hope these tips and tricks help you master Next.js 14 and streamline your development process. Remember, handling images, managing environment variables, understanding caching, optimizing data fetching, and distinguishing between client and server components are key to building efficient and scalable applications.
Don’t forget to comment. This way, we can learn and improve our guides, tutorials, and best practices. Happy coding!
Subscribe and Follow
If you enjoyed this post, subscribe to our blog and YouTube channel for more tips and tutorials. Follow us on social media to stay updated with the latest trends in web development.
Join the Community
Join our community on [Discord/Forum] to share your experiences, ask questions, and connect with other developers.
Stay Tuned
Stay tuned for more blog posts and videos on advanced Next.js techniques, React development, and more!


